Table of Contents
Last Updated: November 04, 2025
Written By: Nasrumminallah Zeeshan, WordPress Technical Writer, WP Tech Support
A Note from WP Tech Support’s Certified Full-Stack Developer: This guide details the technical steps for manual installation. For established sites, high-traffic projects, or if you prefer zero risk, outsourcing the installation, security, and optimization to our experts is the smartest choice.
Let’s learn how to create a WordPress website.
The process is technical, yet it helps you finish the job without learning how to code. However, if you don’t know how to proceed, it would be good if you contact our WordPress specialists for a secure, fixed-price installation. In this article, we’ll learn the following key points:
In this article, we’ll learn the following key points:
- Overview of the process: See what it takes to create a WordPress website.
- Requirements for creating a WordPress site: You’ll need to create essential assets, such as a Database and appropriate security files, before proceeding to installation.
- How-to procedure of the process: Know how to create a WordPress website.
So, let’s start without further delay.
Create a WordPress website
Overview
Before you start the process, you should have decided on your site’s niche.
Then, you need to spend some money on a domain name—also called the site’s address—followed by web hosting, which stores the site’s files on a server.
You’ll need to go through some technical routines, such as the site’s installation and configuration. This stage is critical for speed and security.
Once completed, you can expect a ready platform, one you can make changes to later.
Requirements to create a WordPress website
In the following lines, we’ll list the requirements for creating a WordPress site and briefly describe each requirement.
Industry or site’s Niche
The industry or topic you choose for a site is called your site’s Niche.
For example, our blog, which you’re reading now, is based on the WordPress niche. Here, you can read about WordPress matters, maintenance, errors, and performance improvements.
Once you’ve chosen a site’s niche, stay relevant, publish content around relevant topics, and monitor performance over time regularly. This will help you stay relevant, attract an audience, and increase your site’s conversions.
Domain Name and Web Hosting
- Domain name: A domain name refers to a site’s address on the Internet. For example, our site’s URL or address is wp-techsupport.com. Similarly, if you want to create a WordPress site, you’ll need to choose a domain first. Keep in mind that buying a domain costs around $12 per year. Once completed, you’ll need to wait for another asset: the web hosting plan, to store the site’s files online. Let’s proceed further and describe.
- Web Hosting plan: A web hosting plan costs $25-50 per year. The plan helps users store the site’s files on a server. Once you buy one, you can proceed to run the WordPress installation. Note: Choosing the right host is essential for long-term speed. Our Performance Architects can recommend the best option.
WordPress Package
WordPress – the open-source package used to create and manage a website- is essential for the project.
You can download the package from WordPress.org.
In the previous steps, we discussed using a web hosting plan. Once you’ve set up a hosting plan, you must upload the WordPress package. Perfect.
Technical expertise
Of course, you can’t ignore the expertise required for technical procedures.
Here, you need to consider a rule of thumb.
Listen – if you’re not technical enough, you should hire our specialists who guarantee the job for you.
Let’s proceed to the How-To section.
Note: The following section helps users understand the How-To procedure for creating a WordPress site. It covers step-by-step actions and suggestions for avoiding errors.
How to create a WordPress website?
We will proceed with a step-by-step process to create a WordPress website.
Step 1: Choose a site’s Niche
A niche is the main topic of a site. It can also be called an “Industry”.
In this case, a niche helps you narrow down the target audience and the type of products or services you’ll offer, allowing you to segment your business accordingly.
So, how should you proceed to choose a site’s niche?
Listen – pick 1-5 niches based on personal preference.
Next, remove the ones you can skip one by one and leave the ones you’d always like to have on site.
Here is a list of niches for your reference:
- Sports
- Technology
- Health and Medicines
- Outdoor Travels
- SaaS products
- Freelancing
- Software industry
Once you’ve chosen a site’s niche, avoid some issues, like changing the niche after a month, let’s say. Do not change your site’s niche; you’ve already researched niches before taking action.
Next, once a niche for sites has been adjusted, the next step involves creating relevant content around relevant topics. It helps you position your site in the eyes of search engines. Period.
The goal is to ensure that your site is optimized for relevant keywords for search engines. This helps users drive organic traffic from search engines and enables you to drive users searching for relevant content on search engines. Later, when monetized, the organic users help you increase conversions, and that’s how you can do business.
Step 2: Buy a Domain name and a Web Hosting plan
As described earlier, a domain name is used to access a website online. It is also called a Uniform Resource Locator (URL), domain name, address, or Link.
On the other hand, a web hosting plan helps users store a site’s files, as described above.
We also discussed buying a domain name and a web hosting plan, which costs money.

Let’s summarize the matter below.
- Domain Name: $12 per year
- Web Hosting plan: $25-50 per year
Once you have purchased your domain and hosting, you will receive login credentials. Proceed to your cPanel or hosting dashboard to begin installation.
Step 3: Install the WordPress package
There are two ways to install WordPress.
- Install WordPress using the cPanel auto-installer script
- If you know how to install WordPress, you can install it manually.
Notes
- Automated scripts in cPanel help users quickly install WordPress. This option is ideal for beginners.
- Manual installation requires expertise in file management, database creation, and security protocols. Hire a WordPress specialist if you don’t know what needs your attention.
Hire a WordPress specialist if you don’t know what needs your attention.

Let’s proceed further.
In this article, we will review the manual WordPress installation process.
Here are the steps involved.
Steps 3.1: Download the WordPress package
You’ll need to download the package from the WordPress official website. Here you can do.
Once you’ve downloaded the package, you can proceed to the next step.
Step 3.2: Upload the WordPress package
Next, you’ll need to log in to Hosting cPanel -> File Manager.
Once logged in, you can use the “Upload” option. Make sure you are present inside the “Public_HTML” folder in the hosting File Manager when using this option.
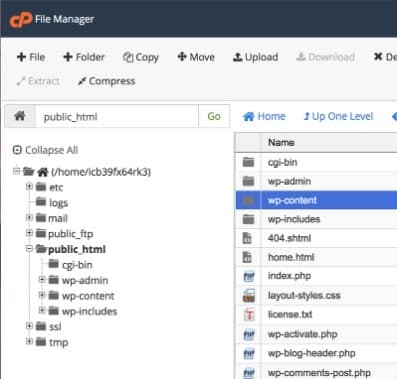
Now, wait until the package has been uploaded successfully. Closing the upload window can break the process. Keep in mind. Period.
Listen—once the WordPress package has finished uploading, use the Extract option to extract the folder’s content.
Let’s proceed to the next step.
Step 3.3: Manage the package
The “Extract” option extracts the folder’s content to a “WordPress” named folder.
Now, you need to move the files to the root of the “Public_HTML” folder.
Get inside the “WordPress” folder and select all files. Next, the “Move” command can move the files to the root.
Once completed, you can safely delete the “WordPress” folder, which has become empty.
Note: Interfaces may differ from hosting to hosting. You should understand how things work under hosting options. Remember that if you don’t put the files under the Public_HTML root, the installation will not work when you visit your site’s domain name. If it doesn’t happen, you should review the steps.
Now, let’s move forward to the next step. Perfect.

Step 3.4: Run the WordPress Installer
You will need to visit the domain. The first screen you should see is the “language selection prompt,” where you can choose “English” and proceed.
As you have already moved the necessary files to the root, the installation script should run when you visit your site’s domain name. Perfect.
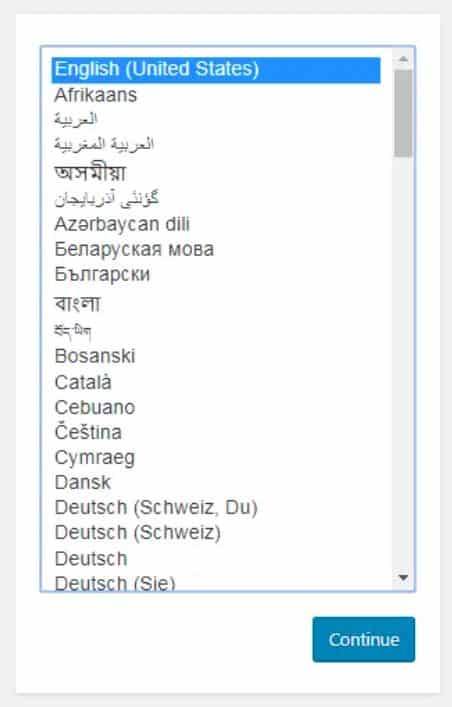
In this case, if everything has gone well, you should see the WordPress installation welcome prompt. Proceed accordingly.
Step 3.5: Create essentials
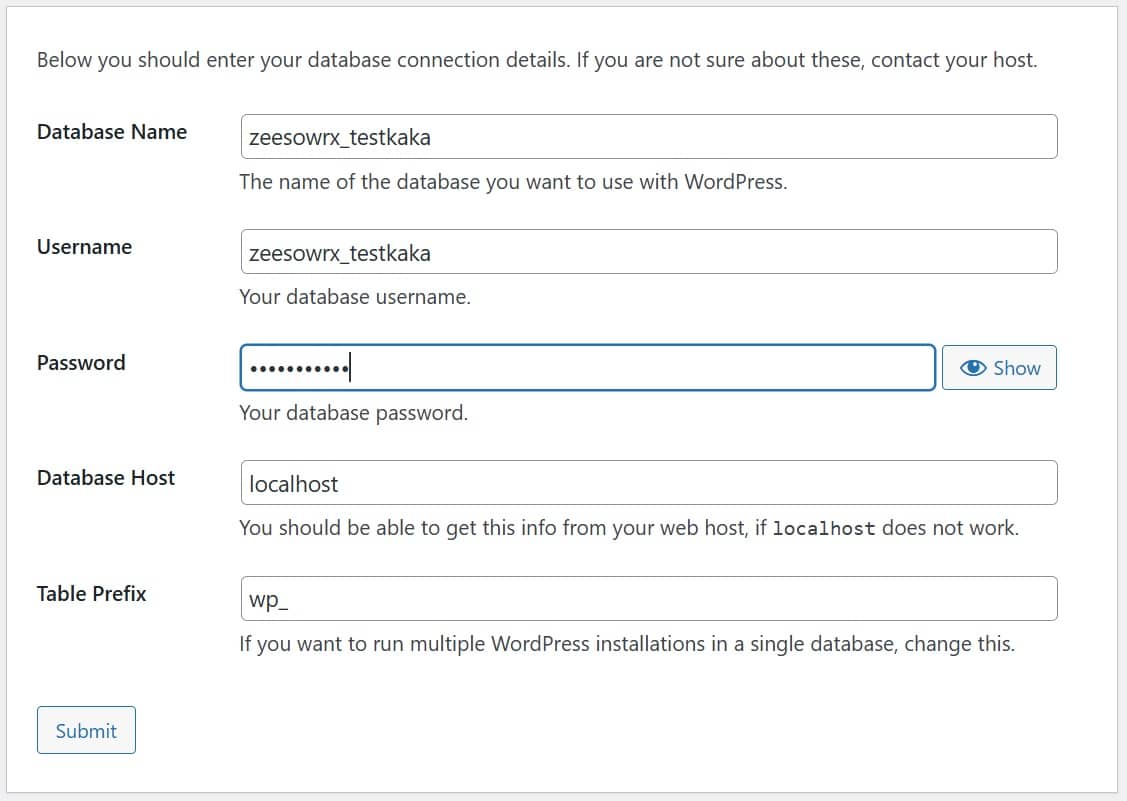
You need to create the following assets to continue the installation process.
- Database name
- Database username
- Database password
Note: You can create the assets using the “Databases” option in the hosting cPanel options. Creating the assets listed above is essential before you are ready to proceed with the installation. Moreover, you must assign full privileges to the database user over the database. If no user access is assigned, the installation process can return errors, stopping the process.
Once created, you can proceed with the installation process.
Step 3.6: Basic settings
Once you have entered the above details, the installation will show a prompt screen to run the installer.
Proceed accordingly. If you see the screen to proceed, you are heading in the right direction. Perfect.
The next screen should list the basic information you’ll need to fill out, such as the dashboard’s username and password, admin email address, and site title.
You should carefully fill out the input fields and proceed. In the end, an option says, “Discourage search engines from indexing this site“. Make sure you don’t change this option.
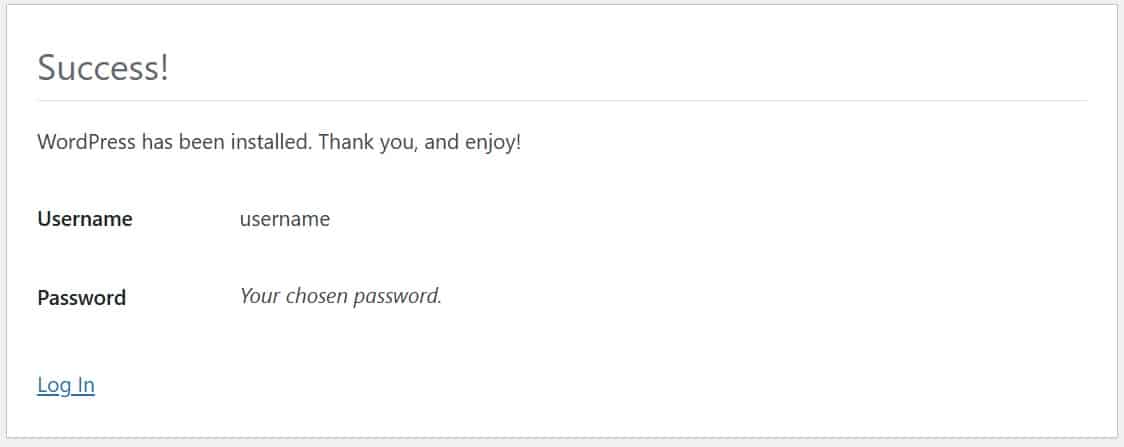
Once everything is perfect, you should see the success message on the next screen. This ensures that the WordPress installation process has gone well.
You can also see the “Login” prompt on the screen. Click “Login” to proceed.
Step 3.7: Log into WordPress dashboard
Now, you can safely log into the WordPress dashboard.
Once everything is perfect, you should see the success message on the next screen. This ensures that the WordPress installation process has gone well. Congratulations!
Let’s proceed further and discuss other essentials in the process.
Dashboard Settings

Once the WordPress installation process has finished, you should consider the dashboard essentials.
For example, the default package includes sample content, posts, and ad pages for users to preview. You should proceed and remove them for now. It’s not rocket science.
In this case, you should carefully land on the Posts, Pages, and Dashboard screens to remove and set things accordingly.
Here is what you should pay attention to in the dashboard.
- On the welcome screen after logging into the dashboard, click “screen options” and close unnecessary panels. This helps keep the interface clean, fast, and minimal.
- Second, land on the Posts and Pages areas and remove all the sample and default pages.
- On the Appearance page, you can upload your favorite theme or page builder. Make sure to leave a default theme as well.
- Log in to the Plugins page and remove all the default plugins. Install the ones you prefer, such as WordFence for security.
- Finally, you can check the pages under the “Settings” menu to set things accordingly. Here, you should pay attention to the General and Permalinks pages. Once set, don’t change the options.
Now, here is what you should proceed with on the dashboard.
Essentials after WordPress Installation
Here is what you should consider once you have finished installing WordPress.
You should have also logged into WordPress and cleared the default content.
Let’s proceed further.
First, you should prepare to install your favorite theme or page builder. It helps you design your site the way you want.
Once a page builder or theme is installed, consider the following secondary aspects of your WordPress website.
- Make sure your site’s SSL certificate has been properly installed. Look, it is not rocket science. Once you have bought a Domain name and web hosting, the system automatically installs SSL. If that is not the case with you, you can ask the hosting support agents. One way to check if your site’s SSL has been correctly installed is to use the online SSL checkers. Such tools help you show if there is an error in the SSL installation. Usually, if the site’s SSL has been correctly installed, you can see a “Lock” symbol in the browser window. Perfect.
- Install a plugin for WordPress security, such as WordFence. A plugin helps you automatically block unwanted traffic, attacks, and malicious scripts. Once installed, you can set the plugin to let you know if someone attacks your site with malicious vectors. You can even block unwanted users, traffic, and IPs.
- You can skip the step, but it is better to integrate Google Analytics and Search Console for improved insights. Analytics helps you see your site’s traffic sources, while Search Console allows users to improve search visibility on Google pages. If you want to skip, consider your site’s early stage. You can skip the integration process because there are no stats for now.
- Once you have correctly set everything, from installing essentials to starting the design process of your site’s custom pages, you should take a backup copy. This helps you keep a stable version of what you prefer, a “clean installation package”, at the start.
- Look, you need to check your site’s preferred URL version. A preferred URL version is the one all other URL versions are redirecting to in real life. To proceed, check on the dashboard’s Settings -> General page to see if your site’s URL is correctly redirecting to the one you see on the General page. To check, you will need to use an online redirect checking tool. Don’t make any changes if you don’t know what to do with a site URL version. Remember that changing the URL on the General page can break a site.
Now, as you’ve gone through all the essentials, here is what you should do next.
- Start designing your site with the page builder theme you uploaded. This ensures that you proceed to the final version of your site that you want to see.
- Second, you should take your site backup for reference once the design process has finished. This process is essential.
- Moreover, always take separate backups for custom templates with a page builder. It helps you avoid taking full site backups. It also enables you to clone a design interface on a similar website if you would like to replicate the same design on another project. Perfect.
- Finally, focus on speed and errors. See if the page speed is reasonably acceptable. If not, you may need to hire WordPress specialists to make improvements. Speed improvement is a technical task, not possible for beginners.
- Lastly, focus on marketing. Here is what you should consider. Focus on content creation, optimization according to SEO rules, and monitoring performance to see if things are heading in the right direction. Once your site starts driving users, conversions are the first thing you should focus on. See if the site is converting users into paying customers. And, of course, you should have monetized your site in some way, such as digital products, before you can improve or measure conversions.
Professional Tips
- See the domain’s WHOIS records for the previous history. Do not buy a domain with an earlier historical record. Such domains may have been used maliciously and are unsuitable for new projects.
- Always sign up for a basic web hosting plan. Remember that you don’t need to sign up for fancy options.
- Choose a basic hosting company that can serve small sites well. Once your site’s traffic increases, you can switch to a more robust, fast, and premium web hosting environment.
- If you don’t know how to install WordPress manually, use the auto-installer option in the hosting cPanel area. It helps you enter essentials and proceed to finalize the installation process. There are no complex routines.
- You will need to create the requirements for installation separately in the Hosting cPanel area, including a database, its username, and its password. Once the installation process proceeds, you must enter a credential combination for the WordPress dashboard login. Pay attention.
- Remember, the design process of the site starts once you have correctly installed WordPress, uploaded a theme or page builder, and checked everything. Later, once you have set up the essentials well, you can make new changes and take site backups.
- Finally, remember to prepare a marketing strategy to drive real business. This phase requires SEO experts, content creators and managers, and conversion optimizers to improve performance.
Final words
So, how do you create a WordPress website?
To this line, you should have learned how to install WordPress on a new domain, with a fresh web hosting plan, by using the auto-installers or manual routine. Listen—if you don’t understand what you will change, having our experts suggest what’s possible would be good.
Changing complex settings in a WordPress environment can lead to disasters. Secure your installation today.
About the Author: Nasrumminallah Zeeshan
Nasrumminallah Zeeshan is a WordPress Specialist and Lead Writer at WP Tech Support. He brings seven years of deep expertise in managing and securing high-volume WordPress installations, with a core focus on database optimization and maintaining the stability of the WordPress core. His mission is to simplify complicated WordPress trends and products, helping readers and customers understand and implement best practices through practical, easy-to-digest educational content.
Connect with Nasrumminallah Zeeshan on LinkedIn.
